The Brunch Savior: Southern Spice Fried Chicken and Honey Butter Waffles

Some people say ‘less is more.’ Those people have clearly never drowned their fried chicken and waffles in syrup.

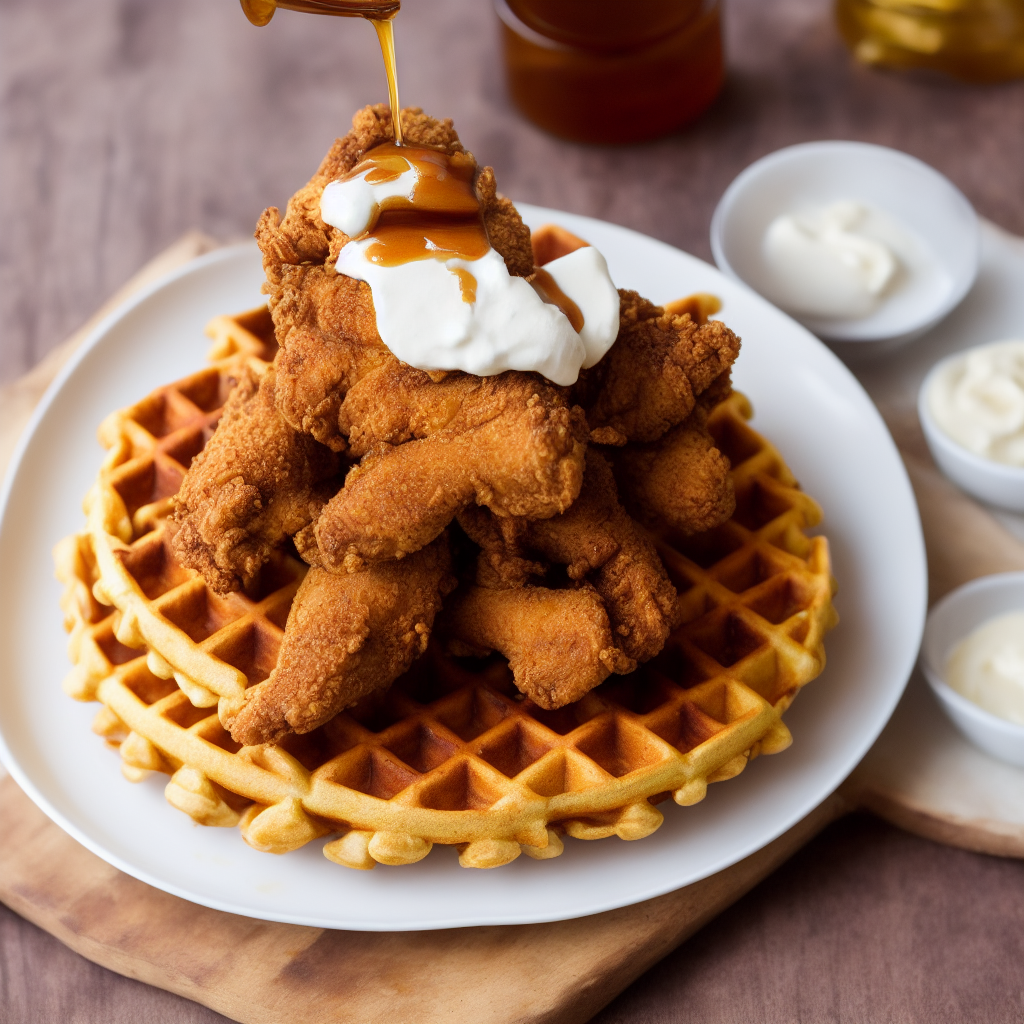
Today, I’m excited to discuss one of my all-time favorite comfort foods: Southern Spice Fried Chicken and Honey Butter Waffles. This mouthwatering dish has become a staple at our family’s brunch gatherings, and I’m excited to share its journey with you.

To be honest, I wasn’t always a pro at cooking fried chicken and waffles. My initial attempts were anything but successful; the chicken was dry, the waffles were soggy, and it was a recipe for disaster. Despite the initial setbacks, I refused to give up. I made incremental adjustments, tried out different ingredients until I finally hit the sweet spot – a balance of spices, texture, and flavor that blended harmoniously.

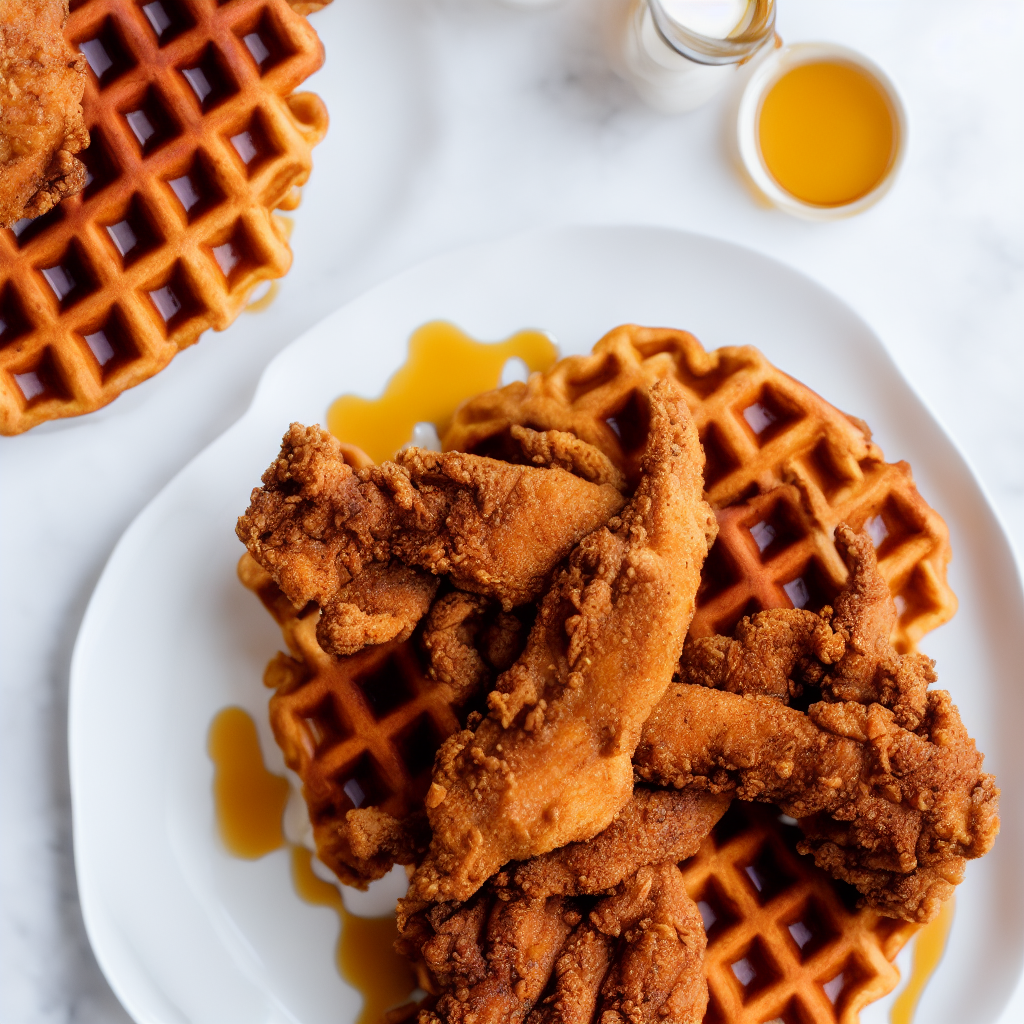
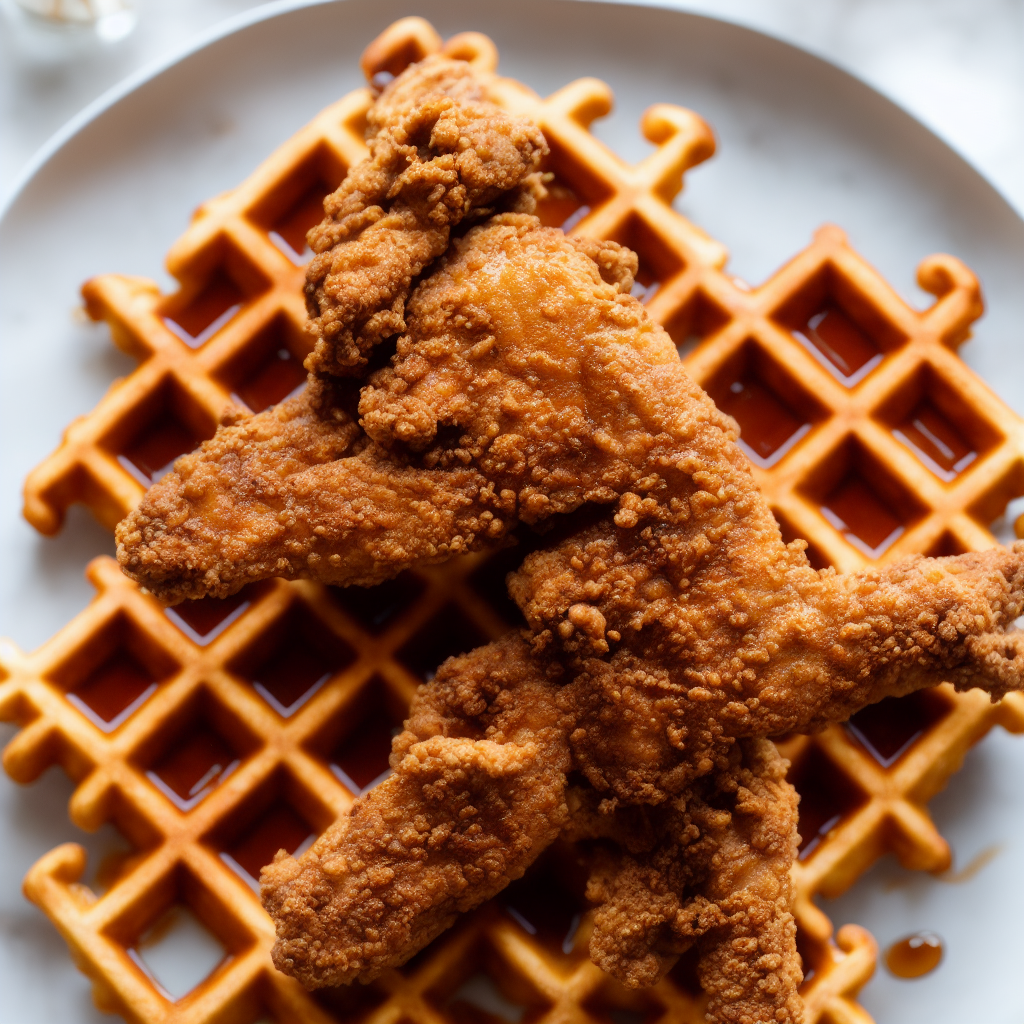
When you take that first bite of Southern Spice Fried Chicken and Honey Butter Waffles, it’s like a symphony of flavor and texture. The smoky and savory flavor of the chicken is perfectly matched with the sweet and buttery taste of the waffles. Top it off with a drizzle of honey, butter, and maple syrup, and you’ll be in flavor heaven.

One of the most attractive features of this recipe is its versatility. You can serve it for breakfast, brunch, or even dinner, and it’s perfect for feeding a crowd. I’ve served this dish at numerous family gatherings and church picnics, and it’s always a hit.

Now, I know that some of you might be intimidated by the idea of preparing fried chicken and waffles from scratch. But trust me, it’s not as difficult as you might think. With a little bit of patience, love, and following the recipe carefully, anyone can make this dish.

If you’re looking to improve your brunch game or simply crave some good old-fashioned comfort food, I highly recommend you give Southern Spice Fried Chicken and Honey Butter Waffles a try. Your taste buds will thank you.

Waffle + chicken + syrup = pure happiness. It’s simple math, really.

The Ingredients

For the fried chicken:

  • 4 chicken breasts, boneless and skinless
  • 1 cup all-purpose flour
  • 1 tablespoon paprika
  • 1 tablespoon garlic powder
  • 1 tablespoon onion powder
  • 1 teaspoon cayenne pepper
  • 1 teaspoon dried thyme
  • 1 teaspoon salt
  • 1 teaspoon black pepper
  • 2 eggs
  • 1/4 cup milk
  • 1 cup panko breadcrumbs
  • Vegetable oil for frying

For the honey butter waffles:

  • 2 cups all-purpose flour
  • 2 tablespoons sugar
  • 2 teaspoons baking powder
  • 1 teaspoon baking soda
  • 1/2 teaspoon salt
  • 1 1/2 cups buttermilk
  • 2 eggs
  • 1/2 cup melted butter
  • 1/4 cup honey

For serving:

  • Honey
  • Butter
  • Maple syrup

Note: This recipe is designed to feed 4 people. To feed more or less, simply adjust the quantities of the ingredients accordingly.

The Directions

For the fried chicken:

  1. In a shallow bowl, whisk together flour, paprika, garlic powder, onion powder, cayenne pepper, thyme, salt, and pepper.
  2. In another shallow bowl, whisk together eggs and milk.
  3. In a third shallow bowl, place panko breadcrumbs.
  4. Dip each chicken breast in the flour mixture, then in the egg mixture, and then coat in the panko breadcrumbs.
  5. Heat about 1 inch of oil in a large frying pan over medium-high heat. Once the oil is hot, add the chicken breasts and fry until golden brown and cooked through, about 6-8 minutes per side. Remove from the pan and drain on paper towels.

For the honey butter waffles:

  1. In a large mixing bowl, whisk together flour, sugar, baking powder, baking soda, and salt.
  2. In a separate bowl, whisk together buttermilk, eggs, melted butter, and honey.
  3. Pour the wet ingredients into the dry ingredients and stir until just combined.
  4. Preheat a waffle iron and lightly grease with non-stick cooking spray. Pour the batter into the waffle iron and cook until golden and crispy.

To serve:

  1. Serve the fried chicken and waffles together, topped with honey, butter, and maple syrup. Enjoy!

I may not have my life together, but I can stack fried chicken and waffles like a boss.

The Sweetest Breakfast Treat: Cinnamon Roll French Toast

I’m back with another recipe that’s sure to knock your socks off: Cinnamon Roll French Toast. I don’t know about you, but there’s nothing I love more than a sweet and comforting breakfast, and this dish hits all the right notes.

Let me tell you a little bit about how I came up with this recipe. I was in the mood for something indulgent and sweet, but I didn’t want to go through the trouble of making actual cinnamon rolls. So, I decided to combine two of my favorite breakfast foods: French toast and cinnamon rolls.

The result was a heavenly creation that I’ve been making ever since. The bread slices are thick and fluffy, with a crispy exterior that gives way to a soft and creamy interior. The cream cheese mixture is tangy and rich, with just the right amount of sweetness from the brown sugar and spices. And the icing on top is the perfect finishing touch, with a silky texture and a delicious vanilla flavor.

Now, I recommend using brioche or challah bread for the best results, but if you don’t have those on hand, regular bread will work just fine. The important thing is to make sure the bread slices are thick and sturdy, so they can hold up to the egg mixture and cream cheese filling.

Now, when I make this recipe, I get compliments from everyone who tries it. It’s the perfect dish to make for a special occasion or just a lazy weekend morning. It’s also easy to adjust the recipe based on how many people you’re feeding. Just increase or decrease the number of bread slices and adjust the amount of egg mixture and icing accordingly.

So, there you have it, folks. Cinnamon Roll French Toast: the ultimate breakfast indulgence. I hope you give it a try and enjoy it as much as I do. And don’t forget to experiment with the recipe and make it your own. Maybe try adding some fresh fruit or a drizzle of caramel on top. Whatever you do, just have fun with it.

Thanks for reading, y’all. Now go and enjoy your Cinnamon Roll French Toast!

The Ingredients

French Toast:

  • 8-10 slices of brioche or challah bread, cut into 1-inch thick slices
  • 4 large eggs
  • 1/2 cup whole milk
  • 1 tsp vanilla extract
  • 1/2 tsp ground cinnamon
  • 1/4 tsp ground nutmeg
  • 1/4 cup brown sugar
  • 4 oz cream cheese, softened
  • 2 tbsp unsalted butter

Icing:

  • 1 cup powdered sugar
  • 2-3 tbsp milk
  • 1 tsp vanilla extract

This recipe makes enough for 4 people, but you can easily adjust the quantities to feed more or less people. If you need to make more, simply double or triple the ingredients, and if you need to make less, cut the ingredients in half or in quarters.

The Directions

For the French Toast:

  1. In a shallow dish, whisk together the eggs, milk, vanilla extract, cinnamon, nutmeg, and brown sugar until well combined. Add in the softened cream cheese and whisk until the mixture is smooth and creamy.
  2. Dip each slice of bread into the egg mixture, making sure that it is fully coated on both sides.
  3. In a large skillet over medium heat, melt 1 tablespoon of the unsalted butter. Add the coated bread slices to the skillet and cook for about 2-3 minutes on each side or until golden brown.
  4. Repeat the previous step until all the bread slices are cooked, adding more butter as needed.

For the Icing:

  1. In a small bowl, whisk together the powdered sugar, milk, and vanilla extract until smooth.
  2. Drizzle the icing over the French toast while it is still warm, and serve immediately.

This recipe makes enough for 4 people, but you can easily adjust the quantities to feed more or less people. If you need to make more, simply double or triple the ingredients, and if you need to make less, cut the ingredients in half or in quarters.

Enjoy your Cinnamon Roll French Toast, and savor the rich and delicious flavors of this decadent breakfast treat!

How I Turned a Classic Sandwich into a Flavor-Packed Masterpiece

Hi there, I’m excited to share my new recipe for Savory Garlic and Herb Grilled Cheese! I’ve always loved grilled cheese sandwiches, but I wanted to give them a little twist to make them even better.

I’ve had some failed attempts in the past, like when I tried to add too many ingredients or didn’t cook the sandwich long enough, but I learned from my mistakes and came up with a recipe that’s a winner. The combination of sourdough bread, melted provolone and mozzarella cheese, and a garlic and herb mixture makes this sandwich bursting with flavor.

When I first made this recipe, I was surprised at how easy it was to put together. All you need are a few simple ingredients, and you’ll have a sandwich that looks and smells amazing. The golden-brown color of the bread and the stretchy melted cheese filling are so inviting, you’ll want to take a bite right away.

The aroma of the garlic and herbs is strong but not overpowering, and it’ll make your mouth water with anticipation. And when you take a bite, the chewy texture of the sourdough bread, the savory cheese, and the fragrant herbs all combine to create a taste explosion in your mouth.

I have so many great memories of eating grilled cheese sandwiches with my family, and now I’m excited to create new memories with my Savory Garlic and Herb Grilled Cheese recipe. It’s perfect for lunch or dinner, and it’s sure to please even the pickiest eaters.

So, next time you’re in the mood for a classic sandwich with a twist, give my recipe a try. I promise you won’t be disappointed. And if you have any leftover ingredients, you can always make more sandwiches or use them in other recipes. Enjoy!

The Ingredients

  • 8 slices of sourdough bread
  • 8 tablespoons of butter, softened
  • 8 slices of provolone cheese
  • 8 slices of mozzarella cheese
  • 4 tablespoons of minced garlic
  • 4 tablespoons of chopped fresh herbs (such as rosemary, thyme, or basil)

Note: This recipe serves 4 people, so adjust the ingredients accordingly if you need to make more or less. You can also customize the herbs to your liking or add additional ingredients to make the sandwich more filling, such as bacon or tomato.

The Directions

  1. Preheat a skillet over medium heat.
  2. Spread 1 tablespoon of butter on one side of each slice of sourdough bread.
  3. Place 4 slices of bread butter-side down in the skillet.
  4. Add 1 slice of provolone cheese and 1 slice of mozzarella cheese on top of each slice of bread.
  5. Sprinkle 1 tablespoon of minced garlic and 1 tablespoon of chopped fresh herbs over the cheese.
  6. Top with the remaining slices of bread, butter-side up.
  7. Cook for 3-4 minutes on each side or until the bread is golden brown and the cheese is melted.
  8. Remove from the skillet and let cool for a minute.
  9. Cut each sandwich in half and serve hot.

Note: This recipe serves 4 people, so adjust the ingredients accordingly if you need to make more or less. This sandwich is best enjoyed hot and fresh out of the skillet.

Taco ’bout Delicious: My Quest for the Perfect Vegan Taco

Hey there, fellow foodies! Today, I’m sharing with you my recipe for Savory Sweet Potato and Black Bean Vegan Tacos, a dish that has become a staple in my household. I’ve always loved tacos, but since adopting a vegan diet, I’ve had to get creative with my fillings. After many failed attempts, I finally found the perfect combination of flavors and textures that make these tacos irresistible.

I remember one time I tried making vegan tacos with tofu, and let’s just say it was a disaster. The tofu was too mushy and the flavor was bland. But I didn’t give up. I kept experimenting with different ingredients until I found the perfect filling: sweet potatoes and black beans.

The sweet potatoes add a subtle sweetness that balances perfectly with the savory black beans and spices. And let’s not forget the toppings: fresh tomatoes, cilantro, and avocado. The combination of flavors and textures creates a delicious and satisfying meal that everyone will love.

When I first made these tacos, I was worried that the sweet potatoes would be too mushy. But after roasting them in the oven, they turned out perfectly soft and lightly browned. And the black beans add a hearty texture that makes the filling feel substantial.

Overall, these Savory Sweet Potato and Black Bean Vegan Tacos have become one of my favorite meals to make. They’re easy to prepare, packed with flavor and nutrition, and are sure to please even the pickiest eaters. So give them a try and let me know what you think!

Thanks for reading, and happy cooking!

The Ingredients

  • 4 large sweet potatoes, peeled and cubed
  • 2 cans of black beans, drained and rinsed
  • 2 tablespoons of olive oil
  • 2 teaspoons of cumin
  • 2 teaspoons of chili powder
  • 1 teaspoon of garlic powder
  • Salt and pepper to taste
  • 8 small flour tortillas
  • 2 large tomatoes, diced
  • 1/2 cup of fresh cilantro, chopped
  • 2 avocados, diced

To feed more people, simply multiply the ingredients by the number of additional servings needed. For example, to serve 8 people, you would need to double all the ingredients listed above.

The Directions

  1. Preheat the oven to 400 degrees Fahrenheit.
  2. Toss the sweet potato cubes with olive oil, cumin, chili powder, garlic powder, salt, and pepper. Spread the mixture onto a baking sheet and roast in the oven for 20-25 minutes, until the sweet potatoes are soft and lightly browned.
  3. Remove the baking sheet from the oven and add the black beans to the pan, stirring to combine. Return the baking sheet to the oven and roast for an additional 5-10 minutes, until the beans are heated through.
  4. Warm the tortillas in the oven or on the stovetop.
  5. To assemble the tacos, fill each tortilla with the sweet potato and black bean mixture. Top with diced tomatoes, cilantro, and avocado.
  6. Serve immediately and enjoy!

Remember, these ingredients are enough to make 4 servings, but you can easily multiply the recipe to feed more people. These Savory Sweet Potato and Black Bean Vegan Tacos are a delicious and easy-to-make meal that is sure to please everyone at the table.

Grandpa George’s Classic Meatloaf: A Recipe Worth Passing Down

Some people say Meatloaf is a weird name for a dish. Those people clearly haven’t tasted this one.

Hey there, it’s Grandpa George here, and today I’m sharing one of my all-time favorite recipes: Classic Meatloaf. I’ve been making this dish for decades, and it’s always been a hit with my family and friends.

Now, I’ll be honest with you, it hasn’t always been smooth sailing in the Meatloaf department. I’ve had my fair share of failed attempts, from overcooking it to underseasoning it. But I’ve learned a thing or two over the years, and I’ve perfected this recipe to the point where it’s pretty darn near perfect.

One thing that’s always made this dish a favorite of mine is the combination of ground beef and pork. The pork adds a richness and depth of flavor that you just can’t get with beef alone. And of course, the breadcrumbs and seasonings make it perfectly savory and delicious.

I remember eating Meatloaf as a kid, back in the 1950s. It was a staple of American comfort food, and it’s still just as delicious today as it was back then. There’s just something about the combination of savory meat, tender breadcrumbs, and tangy ketchup that makes this dish the ultimate in comfort food.

And the best part about this recipe? It’s incredibly versatile. You can customize the seasonings to your liking, add veggies like bell peppers or carrots, or experiment with different toppings. And it’s perfect for feeding a crowd – just multiply the ingredients to make as much as you need.

So, without further ado, I present to you Grandpa George’s Classic Meatloaf. Trust me, your taste buds will thank you.

Thanks for tuning in, and happy cooking!

Grandpa George’s Meatloaf: the ultimate comfort food, served with a side of nostalgia.

The Ingredients

  • 1 pound ground beef
  • 1 pound ground pork
  • 1 cup breadcrumbs
  • 2 eggs
  • 1 onion, finely chopped
  • 1 green bell pepper, finely chopped
  • 1 teaspoon salt
  • 1/2 teaspoon black pepper
  • 1 teaspoon garlic powder
  • 1 teaspoon onion powder
  • 2 tablespoons Worcestershire sauce
  • 1/2 cup ketchup
  • 1/4 cup brown sugar
  • 1 tablespoon apple cider vinegar

This recipe should provide enough Meatloaf for 4 people. If you need to feed more people, simply multiply the quantities of each ingredient by the number of additional people you need to serve. For example, if you want to feed 8 people, you would need to use 2 pounds of ground beef, 2 pounds of ground pork, 2 cups of breadcrumbs, 4 eggs, etc.

The Directions

  1. Preheat the oven to 350 degrees F.
  2. In a large bowl, combine the ground beef, ground pork, breadcrumbs, eggs, onion, bell pepper, salt, black pepper, garlic powder, onion powder, and Worcestershire sauce. Mix until well combined.
  3. Shape the mixture into a loaf and place it in a greased loaf pan.
  4. In a small bowl, mix together the ketchup, brown sugar, and apple cider vinegar. Spread the mixture over the top of the Meatloaf.
  5. Bake the Meatloaf for 1 hour and 15 minutes, or until it reaches an internal temperature of 160 degrees F.
  6. Let the Meatloaf rest for 10 minutes before slicing and serving.

Note: This recipe is designed to serve 4 people, but you can easily multiply the ingredients to feed more. Enjoy your Grandpa George’s Classic Meatloaf with a side of mashed potatoes and green beans for the ultimate comfort food meal!

There’s Meatloaf, and then there’s Grandpa George’s Meatloaf. Need I say more?

The Ultimate BLT: A Sandwich Worth Bragging About

Bringing home the bacon, one Ultimate BLT at a time.

As a grandfather of seven, I’ve had plenty of experience in the kitchen. I’ve cooked everything from Thanksgiving turkeys to birthday cakes, but there’s one recipe that I always come back to: the BLT sandwich. It’s a classic American sandwich that never gets old, but I’ve taken it to the next level with my Ultimate BLT recipe.

I have to admit, I haven’t always been a master at making BLT sandwiches. In fact, my first attempts were pretty dismal. The bacon was always too crispy or too chewy, the lettuce was wilted, and the tomatoes were bland. But over the years, I’ve learned a few tricks to perfecting this sandwich.

First, it’s all about the ingredients. I always use thick-cut bacon, which gives the sandwich a hearty and satisfying crunch. I also use butter lettuce, which is crisp and refreshing, and heirloom tomatoes, which are juicy and bursting with flavor. And to take it up a notch, I add avocado and garlic aioli, which add a creamy and tangy twist to the classic sandwich.

But the real secret to my Ultimate BLT is in the preparation. I bake the bacon in the oven, which ensures that it’s perfectly crispy every time. And I toast the bread to just the right level of crispness, so that it provides a satisfying crunch without being too hard.

Whenever I make this sandwich, I’m transported back to my childhood, when my mother would make me a BLT for lunch on a lazy summer day. It’s a sandwich that brings back memories of simple pleasures and happy times, and it’s a recipe that I’m proud to share with my family and friends.

So if you’re looking for a sandwich that’s worth bragging about, try my Ultimate BLT recipe. It’s a classic with a modern twist, and it’s sure to become a new favorite in your recipe collection.

I never sausage a delicious sandwich in my life.

The Ingredients

  • 2 slices of thick-cut bacon
  • 1 slice of sourdough bread
  • 1 leaf of butter lettuce
  • 1/2 medium heirloom tomato
  • 1/4 avocado
  • 1 tablespoon of garlic aioli
  • Salt and pepper to taste

This recipe is designed to serve 1 person, but it can easily be multiplied to serve more. Simply double or triple the ingredients as needed to feed more people.

The Directions

  1. Preheat the oven to 400 degrees Fahrenheit. Line a baking sheet with parchment paper and place the bacon on the sheet. Bake for 15-20 minutes, or until the bacon is crispy.
  2. While the bacon is cooking, toast the bread to your desired level of crispness.
  3. Slice the tomato and avocado.
  4. To assemble the sandwich, spread the garlic aioli on one side of the toasted bread. Layer the bacon, lettuce, tomato, and avocado on top of the garlic aioli, and then top with the other slice of bread.
  5. Cut the sandwich in half and serve immediately.

Note: These ingredients are for 1 serving, but the recipe can easily be multiplied to feed more people.

You butter believe this sandwich is worth the calories.

Warm Up with a Spiced Cinnamon Mocha Latte – My Winter Coffee Obsession!

Pro tip: if you put enough whipped cream on it, it counts as breakfast.

Hey there fellow coffee lovers!

As the middle child in my family, I always felt like I was stuck in the middle of everything. But there’s one thing that’s always kept me grounded: my love of coffee. And let me tell you, this Spiced Cinnamon Mocha Latte recipe is my new winter obsession.

Now, I’ve had my fair share of coffee experiments gone wrong. I remember one time trying to make a fancy latte with foam and everything, and ending up with a big mess all over my kitchen counter. But I learned from my mistakes and kept experimenting until I found the perfect recipe.

This Spiced Cinnamon Mocha Latte is the perfect combination of rich, chocolatey mocha and warm, comforting spices like cinnamon, nutmeg, and allspice. It’s the perfect way to warm up on a cold winter day or to indulge in a cozy evening at home.

Working with the ingredients is a breeze – just mix together the cocoa powder and spices, brew some strong espresso, and top it all off with steamed milk and a sprinkle of cinnamon. And don’t forget the whipped cream if you’re feeling extra indulgent!

I have fond memories of drinking coffee with my family as a teenager, so I’m always looking for new and exciting coffee recipes to try. This Spiced Cinnamon Mocha Latte is definitely a new favorite, and I can’t wait to share it with all of my friends.

So, whether you’re stuck in the middle like me or just looking for a new way to warm up this winter, give this Spiced Cinnamon Mocha Latte a try. I promise you won’t be disappointed!

I’m not a morning person, but this latte is making me reconsider.

The Ingredients

  • 4 shots espresso
  • 4 tbsp cocoa powder
  • 2 tsp cinnamon
  • 1 tsp nutmeg
  • 1 tsp allspice
  • 2 cups milk
  • 4 tbsp sugar (optional)
  • Whipped cream (optional)

This recipe should provide enough for 4 people. To make more, simply multiply the ingredients by the number of additional servings you need, making sure to adjust any measurements accordingly.

The Directions

  1. Brew four shots of espresso and set aside.
  2. In a small bowl, mix together the cocoa powder, cinnamon, nutmeg, and allspice until well combined.
  3. Steam the milk using a milk frother or by heating it in a small saucepan over medium heat until hot and frothy.
  4. Add one tablespoon of the spiced cocoa mixture to each shot of espresso and stir until well combined.
  5. Divide the espresso mixture evenly among four large mugs or glasses.
  6. Pour the steamed milk over the espresso mixture in each mug, filling to the top.
  7. If desired, top each latte with whipped cream and a sprinkle of cinnamon.

Note: This recipe makes enough for 4 servings, but can be easily multiplied to feed more people. Simply adjust the quantities of each ingredient as needed, making sure to maintain the same ratios of espresso, cocoa, spices, and milk for the best flavor.

I can’t adult today, I need a Spiced Cinnamon Mocha Latte ASAP.

Blueberry Muffin Madness: My Hilarious Journey to Heavenly Bliss!

Muffin compares to you! You make my heart crumble with joy, just like the topping on these Heavenly Bliss Blueberry Muffins!

Hey there, foodies! It’s your culinary adventurer, here to share a wild ride with you—a ride that involves fresh blueberries, a whole lot of baking, and, of course, some laughable kitchen mishaps. I call this story “Blueberry Muffin Madness,” and trust me, you’re in for a treat!

It all started when I stumbled upon my grandma’s old recipe for blueberry muffins. Now, anyone who knows me knows that I’m more of a BBQ and grill kinda guy, but something about that handwritten recipe card sparked a fire in me. I decided to take on the challenge and bake the most scrumptious blueberry muffins the world has ever seen!

I mean, how hard could it be, right? Spoiler alert: I was wrong. My first attempt ended with muffins that resembled volcanic rocks—burnt on the outside, gooey on the inside. Turns out, cranking the oven to max heat doesn’t speed up the baking process (who knew?).

Undeterred, I got back to the kitchen, this time armed with a newfound respect for the delicate art of baking. I carefully measured the ingredients, trying my best to channel my inner pastry chef. It wasn’t until I was folding in the blueberries that disaster struck again. I tripped over my shoelace, causing blueberries to fly everywhere like a fruity explosion! I spent the next hour finding rogue blueberries in every nook and cranny.

Despite the setbacks, I was determined. With each attempt, I tweaked the recipe, adding a hint of lemon zest for brightness and a buttery streusel crumble for crunch. Finally, after what felt like a baking marathon, I pulled a batch of muffins from the oven, and they were perfect—golden-brown, bursting with juicy blueberries, and topped with a heavenly crumble!

Biting into those muffins brought back memories of summer mornings at my grandma’s house, where the aroma of fresh muffins wafted through the air. It’s amazing how food can transport you back in time, and in that moment, I felt pure bliss.

So, my fellow muffin enthusiasts, I present to you my “Heavenly Bliss Blueberry Muffins” recipe—a recipe forged through trial, error, and a whole lot of laughter. Whether you’re a grill master like me or a baking aficionado, I hope you enjoy this delicious adventure!

Until next time, keep on cooking, keep on laughing, and never stop exploring the wonderful world of food!

With love and blueberries.

Muffin-nificent! Our blueberry muffins are like a high-five for your mouth!

The Ingredients

For the Blueberry Muffins (Yields 24 muffins):

  • 4 cups all-purpose flour
  • 2 cups granulated sugar
  • 2 teaspoons baking powder
  • 1 teaspoon baking soda
  • 1/2 teaspoon salt
  • 2 cups whole milk
  • 1 cup unsalted butter, melted
  • 2 large eggs
  • 2 teaspoons vanilla extract
  • Zest of 2 lemons
  • 4 cups fresh blueberries

For the Streusel Crumble Topping:

  • 1 cup all-purpose flour
  • 1/2 cup granulated sugar
  • 1/2 cup unsalted butter, cold and cubed
  • 1/2 teaspoon ground cinnamon

Note: This recipe yields 24 muffins, which should serve approximately 12 people (assuming 2 muffins per person). If you wish to serve more people, you can multiply the ingredient quantities proportionally. For example, to serve 24 people, simply double the quantities of each ingredient.

To adjust the recipe for a different number of people, use the following formula:

  • Multiply each ingredient by (desired number of people) / 12.

For instance, if you want to serve 18 people, multiply each ingredient by 18/12 or 1.5 to get the adjusted quantities.

The Directions

Heavenly Bliss Blueberry Muffins (Yields 24 muffins):

  1. Preheat your oven to 375°F (190°C) and line two 12-cup muffin tins with paper muffin liners.
  2. In a large mixing bowl, whisk together the all-purpose flour, granulated sugar, baking powder, baking soda, and salt.
  3. In a separate bowl, combine the whole milk, melted unsalted butter, eggs, vanilla extract, and lemon zest. Mix well until fully combined.
  4. Gradually pour the wet ingredients into the dry ingredients and gently fold until just combined. Be careful not to overmix.
  5. Gently fold in the fresh blueberries until evenly distributed throughout the batter.
  6. Use a spoon or ice cream scoop to fill each muffin cup about 2/3 full with the batter.

Streusel Crumble Topping:

  1. In a medium mixing bowl, combine the all-purpose flour, granulated sugar, cold cubed unsalted butter, and ground cinnamon.
  2. Use a pastry cutter, fork, or your fingers to cut the butter into the dry ingredients until the mixture resembles coarse crumbs.
    Generously sprinkle the streusel crumble topping over each muffin, pressing lightly to adhere.

Baking and Serving:

  1. Place the muffin tins in the preheated oven and bake for 20-25 minutes, or until a toothpick inserted into the center of a muffin comes out clean.
  2. Remove the muffin tins from the oven and allow the muffins to cool in the tins for about 5 minutes before transferring them to a wire rack to cool completely.
    Serve the Heavenly Bliss Blueberry Muffins warm or at room temperature, and enjoy the delightful experience of scrumptious, homemade muffins!


Note: This recipe yields 24 muffins, perfect for sharing the bliss with friends and family! If you’re hosting a larger gathering, you can easily multiply the recipe to create more servings. Whether you’re serving four or forty, these muffins are sure to spread joy and satisfy cravings.

Meet the Michelangelo of muffins, the Beethoven of blueberries, the Shakespeare of streusel! This muffin is a timeless masterpiece—a sonnet of flavors that serenades your taste buds!

Rise and Shine with the Sunrise Breakfast Casserole

Not to be dramatic, but this casserole will change your life.

Hey there, I’m here to share my latest breakfast creation with you: the Sunrise Breakfast Casserole! This recipe is a personal favorite of mine, and it’s been a hit with my family and friends every time I’ve made it.

Now, I have to admit, I wasn’t always a master chef when it came to breakfast casseroles. In fact, I had more than a few failed attempts in the past. My first attempts were dry and bland, and I just couldn’t seem to get the flavors right. But I didn’t give up. I kept experimenting with different ingredients and cooking methods until I found the perfect recipe.

And let me tell you, this Sunrise Breakfast Casserole is definitely the perfect recipe. It’s packed with flavor, thanks to the savory breakfast sausage, creamy cheddar cheese, and fresh green onions. The bread cubes soak up the egg mixture perfectly, creating a moist and delicious casserole that’s sure to please.

One of the things I love most about this recipe is how easy it is to customize. You can add different vegetables, swap out the sausage for bacon or ham, or use different types of cheese. The possibilities are endless!

So why not give this recipe a try and see for yourself why it’s become a family favorite? Whether you’re feeding a crowd or just looking for a hearty breakfast for yourself, the Sunrise Breakfast Casserole is sure to hit the spot.

Thanks for reading, and happy cooking!

Don’t just dream about breakfast – make it a reality with this casserole!

The Ingredients

  • 8 slices of white bread, crusts removed
  • 1 pound of breakfast sausage
  • 8 large eggs
  • 2 cups of whole milk
  • 1 cup of shredded cheddar cheese
  • 1/2 cup of chopped green onions
  • 1 teaspoon of salt
  • 1/2 teaspoon of black pepper
  • 1/4 teaspoon of garlic powder
  • 1/4 teaspoon of paprika

Note that this recipe will serve 4 people, but if you need to feed more or fewer people, you can easily adjust the quantities of the ingredients accordingly. For example, to serve 8 people, you would simply double all of the ingredients.

The Directions

  1. Preheat the oven to 350°F (175°C). Grease a 9×13 inch baking dish.
  2. Cut the bread into small cubes and place them in the prepared baking dish.
  3. In a large skillet, cook the sausage over medium heat until browned and cooked through. Drain off any excess grease.
  4. In a medium bowl, whisk together the eggs, milk, salt, pepper, garlic powder, and paprika.
  5. Pour the egg mixture over the bread cubes in the baking dish.
  6. Top with the cooked sausage, shredded cheese, and chopped green onions.
  7. Bake for 45-50 minutes, until the top is golden brown and the center is set.
  8. Let cool for a few minutes before slicing and serving.

Note that this recipe is designed to make 4 servings, but it can easily be multiplied to feed more people. Just double or triple the quantities of the ingredients as needed. This Sunrise Breakfast Casserole is a delicious and satisfying dish that’s perfect for breakfast or brunch, and is sure to become a new favorite for anyone who loves a hearty and flavorful breakfast!

When in doubt, add more cheese.

Sticky Honey Garlic Barbecue Ribs: A Recipe that’ll Make You Lick Your Fingers

As someone who loves to cook and eat, I’ve always been a fan of barbecue ribs. There’s just something about that tender, juicy meat and sticky-sweet sauce that makes my mouth water. But let me tell you, it took me a while to perfect this recipe.

I remember the first time I tried to make barbecue ribs. I was so excited to try out my new grill and impress my friends with my culinary skills. But when I took my first bite, I was so disappointed. The meat was tough and chewy, the sauce was too watery, and overall it just wasn’t the amazing dish I had hoped for.

But I didn’t give up. I went back to the drawing board, did some research, and experimented with different ingredients and techniques. And after a few tries, I finally landed on the perfect recipe for Sticky Honey Garlic Barbecue Ribs.

The secret, I discovered, is in the slow-cooking process. By wrapping the ribs in foil and cooking them over low heat for several hours, the meat becomes incredibly tender and flavorful. And the sauce, with its perfect balance of sweet, tangy, and smoky flavors, adds the perfect finishing touch.

Now, whenever I make these Sticky Honey Garlic Barbecue Ribs, I’m transported back to memories of backyard barbecues with family and friends. The delicious aroma of the ribs on the grill, the sound of laughter and conversation, and the feeling of warm summer sun on my skin.

So if you’re looking for a dish that’ll make you lick your fingers and leave you craving more, give this recipe a try. With a little patience and some TLC, you’ll have a mouth-watering meal that’s sure to impress.

Ribs: the perfect excuse to wear a bib in public.

The Ingredients

  • 2 racks of pork spare ribs
  • 1/4 cup honey
  • 1/4 cup soy sauce
  • 1/4 cup brown sugar
  • 1/4 cup ketchup
  • 1/4 cup apple cider vinegar
  • 4 cloves garlic, minced
  • 1 tsp smoked paprika
  • 1 tsp cumin
  • Salt and pepper to taste
  • Green onions (for garnish)

Note: If you need to make this recipe for more people, simply multiply the ingredients accordingly.

These ingredients are all easy to find at your local grocery store or butcher shop, and they come together to create a delicious and flavorful dish that is perfect for any occasion.

The Directions

  1. Preheat your grill to 250-275°F.
  2. Remove the membrane from the back of the ribs and season with salt and pepper.
  3. In a medium bowl, whisk together the honey, soy sauce, brown sugar, ketchup, apple cider vinegar, garlic, smoked paprika, and cumin.
  4. Brush the ribs generously with the barbecue sauce on both sides, reserving some sauce for later.
  5. Wrap the ribs in aluminum foil and place them on the grill. Cook for 3-4 hours or until the meat is tender and falls off the bone.
  6. Remove the ribs from the foil and brush with more barbecue sauce.
  7. Turn the grill to high heat and grill the ribs for 2-3 minutes on each side, or until they are nicely charred.
  8. Remove the ribs from the grill and let them rest for a few minutes.
  9. Slice the ribs and serve with extra barbecue sauce and green onions for garnish.

These step-by-step directions are easy to follow and will ensure that your Sticky Honey Garlic Barbecue Ribs turn out perfectly every time. With a little patience and attention to detail, you’ll be able to create a mouth-watering dish that your friends and family will love.

Life is short. Eat the ribs.